
Welcome to my first trophy guide! As you can already see, the game in question, which is the first game numerically in my trophy list, is 3D Dot Game Heroes! This game is pretty much "PS3 Zelda," and I'm not the only one who would give you that response either. It's essentially a love-letter to the old-school top-down RPGs of the old days, like Zelda and Final Fantasy for example. It's actually a ton of fun, the graphics look solid despite being comprised of 3D pixels, the music has a nice chip-tune sound, and here's a fun fact: From Software, the makers of this game, went on to make Dark Souls! I'm sure some of you knew that, but I'm sure some people might not have known that. This isn't the most perfect guide, but I'll do my best to help you in your quest for the platinum trophy! Without further ado, let's begin!
*Note, the character I'm using is one of the preset character models, Knight. I wish I was that good at making a character in this game xD Also, for reference, I played the game on FROM mode, which is Hard Mode. This was done for Spelunker purposes, and some enemy formations, if present in the pictures, may vary if you're not on FROM mode.*
Congratulations! Congratulations! Thank you for playing this far!
This is the platinum trophy that you're working so hard to get. Collect every other trophy and this shiny platinum is yours!
Slice and Diced! Defeated a foe with a sword.
Probably the easiest trophy in the entire game to earn. The first time you use your sword to defeat an enemy, this trophy is yours.
Bullseye! Defeated a foe with a bow.
Another easy one. You can buy the bow in Raejack for 30G, in the shop next to the blacksmith's after you complete the Forest Temple. Arrows are found at any location that sells items, besides being found in a ton of chests throughout Dotnia. Then, simply defeat any enemy with an arrow and this trophy is yours!
Demolitionist! Defeated a foe with a bomb.
Yet another really easy one. You can buy bombs at almost any vendor. Raejack sells individual bombs for 5G, and 10 for 45G. After you have your bombs, find enemies that don't move too much, like the rabbit enemies outside Dotnia Castle and in the western part of Raejack. Simply defeat any enemy with a bomb to get this trophy.
Getting the Hang of It? Played the game for five hours.
This one should come naturally, as even when you're not taking the time to do sidequests and other things, playing for 5 hours is pretty easy. Note that this is cumulative, meaning that you don't need to play for 5 hours straight, just 5 hours in total. To put it into perspective, when I played through Hard Mode on my 2nd playthrough, even after rushing through the game it still took me between 7-10 hours.
Defender! Guarded an attack.
Another one that can basically be done from the get-go. Simply hold R1 to put your shield up. You move slower but you'll block any kind of physical attack. Simply guard an attack and this trophy will pop easily.
A Formidable Foe Has Fallen! Defeated a Guardian.
When you go to get the Ancient Sword after the hero of old puts the sword in its resting place, you have to defeat two large Guardians. All they do is jump around and they only take 3 hits to defeat with your Wooden Sword. After defeating them, this trophy is all yours.


Bested Eelagon! Defeated Eelagon without taking damage.
Eelagon is the first boss you face, at the end of the Grass Temple. To defeat him you have to strike the end of its body, the glowing part. After he speeds up and goes on a frenzy, you repeat the process until it's just the head remaining. Afterwords you can simply continue striking the head repeatedly, but be careful of the shots he fires. As he takes damage the shots get faster and he shoots more as he takes damage. If you take damage, don't worry, this game allows you to re-battle any of the bosses whenever you want. Simply return to the boss room after defeating the boss and interact with the tombstone. This is better suited for later on when you have better swords and shields.
 |
| After defeating a boss, you can return and interact with their tombstone at any time to fight them again and try for the Bested! trophies. |
Bested Queen Bee! Defeated Queen Bee without taking damage.
Queen Bee is the boss of the Forest Temple. She shoots 3 stinger-shots at you, so be sure to guard against them. Despite that she's a bee, which is normally an airborne enemy, you can still hit her with your sword. She shoots faster as she takes damage and eventually the bee servants will attack you and rejoin around her. Repeat the process until you exterminate her Majesty. As with Eelagon, waiting until later is a safer way to get the trophy without much hassle.
Bested Giga Golem! Defeated Giga Golem without taking damage.
As the boss of the Desert Temple, Giga Golem is the start of the harder challenges of trying to take no damage. He will try to crush you under his fists and shoot laser beams from his eyes (seriously, he does). After hacking away at him, you destroy his lower half. At this point, he starts trying to smash you with his fists far more. As he smashes his fists into the ground, they cause small shockwaves. Try to keep your distance and strike his arms. But beware as he'll still try to shoot you with lasers, so watch out when you see his head spin. After you destroy his arms, he becomes very laser-happy and will constantly try to shoot you as he hops around. If you see him jump high up, get as much distance as you can, as when he lands there will be a huge shockwave, but if you're far enough it won't matter. Repeat as needed and eventually Giga Golem will crumble! As usual, coming back later with better equipment makes for an easier time getting the trophy.
Bested Kraken! Defeated Kraken without taking damage.
The Kraken in the Aqua Temple is hard or difficult, almost completely depending on your sword. Having a sword with a lot of length, spin, pierce, and some good strength, will make this boss very easy as you'll be able to hit Kraken from any safe place. Kraken will constantly bring tentacles up from the water, so you have to destroy them to prevent them from hurting and overwhelming you. After he emerges, Kraken will fire 3 balls of ink at you that are slow moving and easy to dodge. The issue is the battlefield, as you have to use the Anchor Rod to get from platform to platform, especially if you take damage and your sword isn't huge anymore. But after enough cat-and-mouse chasing and attacking, Kraken will again sink into the deep blue sea. As always, coming back later with better equipment is recommended.
Bested Dragon! Defeated Dragon without taking damage.
Dragon, the master of the Flame Temple, is a real test of patience if you're trying to avoid taking damage, as you must keep an eye out for its attacks and watch its movements, which only get faster and more spontaneous as it takes damage. It'll shoot fireballs slowly at you, at first, but they'll get faster as it takes damage, and after shooting a series of them, it'll take a pause, then shoot one more to trip you up. Sometimes, it'll fly at you quickly and slam down, making you have to quickly run to avoid it, or it'll hover over you until you're under it, at which point it'll drop down. after taking significant damage, it'll shoot 3 fireballs at a time, some that'll stop at the ground and linger for a short time. You can use the Boomerang to hit its face and stun it briefly, but don't rely on it heavily, just in case. Keep at it until you finally slay the Dragon! As usual, come back with better equipment later on for an easier time. This boss is considered to be the hardest in the game!
Bested Dark Knight! Defeated Dark Knight without taking damage.
The Dark Knight in the Wind Temple is actually a lot easier than you think. Despite that you could sit there and guard until you have an opening, there's an easy way to do it. but first, attacks. He ca slash his sword and send a crescent-shaped shockwave at you that expands as it travels, so keep your shield up if you're not close to him. He can glide across the room and try to strike you, so watch out! Sometimes he'll charge at you with his sword pointed at you. Get out of the way and strike his back! And at low health he'll spin in circles with his sword out after jumping high into the air. if you see it, try to get far away and block! However, let's get to the easy way, kind of. If you attack him and it doesn't do damage, it will stun him. You can literally just attack constantly while swinging your sword and still do damage to him. Granted it won't hit every time and you might get hurt, but I've done it to some pretty good results, so if you're feeling brave, give it a shot and you'll eventually defeat the Dark Knight! As always, try coming back later with better stuff if you didn't get the trophy.
Bested Fuelle! Defeated Fuelle without taking damage.
(This is only about the 2nd time you face him as the first time you cannot win because it's scripted.) At long last, you've finally come face-to-face with Dark Bishop Fuelle. Your journey is finally at its climax, and this time you have the tool to defeat Fuelle: Lighting! After using it, the torch in the middle of the room lights up and you can see the real Fuelle, which is the Fuelle with a shadow. After hitting him, he and his clones will teleport and shoot fireballs at you. Eventually his clones will reach 5, and the real one, with a total of 6 Fuelles. When you reach that point, he's close to death. If you run out of magic to use Lighting with, eventually he will summon enemies that drop red and green apples to help you recover, but you should definitely have a potion or two handy just in case. Hit him enough times and you'll finally defeat him. As this is the final battle in the game, coming back another time works as if you're finishing the story again. So if you miss this trophy and the next trophy, don't worry. Like always you can redo the battles.
Bested Onyx! Defeated Onyx without taking damage.
This is it! The final battle against the Dark King, Onyx! If you can defeat him, you'll have finally brought peace to Dotnia! If your sword is long enough, you can stay way in the back of the arena and hit him from a safe distance. Before fighting Onyx, you're going to want to have the best sword at your disposal at the time, and the Hero Shield if you've obtained it (more info later on in the shield trophy section). Try to keep away cause he'll swipe his tail at you at close range, while from further away he'll shoot out a series of purple projectiles at you. He can also send a series of tornadoes at you so be careful of those too! If you see several floor tiles turn purple, get to a safe tile, as the purple tiles will be struck by lightning. And finally, at low health, he'll shoot an unblockable large projectile at you, be be ready to dodge when you see him charging up! To safely hit him, either stay far away with a huge sword, or wait for him to finish an attack. Sometimes when you hit him he'll fall to his knees for a brief moment, allowing you to get a few hits in. When he's close to death, he'll shoot 3 purple projectiles at you instead of one, so be careful. Keep it up and you'll defeat the Dark King at long last! Congratulations, hero!
Found Sue! You found Sue.
So finding the two fairies is a bit time-locked. If you go a certain point before getting a fairy, you can no longer found them, and a few trophies will be locked until you do a new playthrough. Yikes! As early as completing the Flame Temple, you can go after Sue. If you haven't gotten the Super Key, you're going to have to go to Jim's Shack and buy yourself one of each colored key (red, blue, and green) beforehand. From Ortego Village, head south towards the Desert Temple area. From that area, head west an area, the north to the next area, following the path all the way northwest until you reach a new area with a huge lake. Continue around the lake, opening chests with some G, a Life Shard, and a Small Block, until you reach some stumps. Burn them with the Flame Rod and continue onwards until you see a grapple point to the island in the lake. Use the Anchor Rod and make your way in there after bombing the cracked wall.


Once inside, just make your way through the cave, avoiding traps and defeating enemies and opening colored doors. In one of the rooms, you're asked if the first sage you encountered was Indigo. The answer is no. There's eventually a room with Magi in it, the ones where you have to use reflect to defeat them. To progress, bomb the left wall. In the final room, there ate 3 Silver Knights. If you have magic to spare, use Freeze and quickly defeat them. After you enter the final room, simply talk to Sue to have her join you and this trophy is yours! One fairy down, one to go!


Found Ai! You found Ai.
Ai can be found as soon as you have the Wire Rod, whether you have Sue or not. However, it's best to have Sue first,in order to open the door to more trophies down the line. So, as with Sue's cave, you need the Super Key or one key of each color, then head to Raejack. Go straight north from Raejack and follow the path all the way up and around to area C1, then go east. The cave is in the far southeast portion of the area and you have to bomb your way in.


Like the last area, you have to avoid traps and deal with enemies. You might want to use Freeze to deal with some Cyclops and Black Knights to make your life a little easier. At the back of the area is Ai. Simply talk to her and she'll join you, and this trophy is yours! And as an added bonus, if you do this after having all 6 orbs and getting the first 5 spells from the sages, as well as already having Sue, the fairy trio will become the princess! This must be done BEFORE you get the Light Orb or you can no longer find the fairies!!! This will net you the trophy, Rescued the Princess!


It's Magic! Used a Shader Magic.
This is basically impossible to miss, as magic is required in certain places in the story. You'll earn this before you enter the Forest Temple, as you use the magic Parallax in order to discover your way through the Forest of No Return. After using the magic, this easy trophy is all yours.
 |
| This is the earliest point that you will use magic, just after the first dungeon and just before the second one. |
Life is Precious! Maxed out the LIFE bar.
As the description suggest, you must have the full amount of Apple Containers, which includes just about every Life Shard and ever full Container from defeated bosses. If you collect every Life Shard, you'll end up with 1/4 of a Container in the end, but as long as you have the full amount of apple Containers, you can skip the very last one. I won't mention bosses as those you can't miss anyway. I'll put pictures of every chest they're in, and for others I'll put pictures of their locations, like if they need to be won in a mini game or otherwise noted.
 |
| Talk to this man in Raejack to be asked to defeat enemies. He doesn't tell you that said enemies are Crystal Slimes, rare and very fast enemies that drop 100G or a Small Block. After killing 10, come back to him and he'll reward you with a Life Shard. |
 |
| In the south east corner of Raejack is a cave with this well. For 20G you get a random item like 1G or bombs or arrows. This well also holds a Life Shard but the chances of it appearing are random, so come back with plenty of money to spare! |
 |
| Take a Red Key to this door in the Grass Temple to net yourself another Life Shard. |
 |
| Talk to the left guard and say Yes to receive a Red Letter. Take this to the girl near Raejack's potion shop for a Blue Letter. Take that letter to a man near Dic's house to get the Yellow Letter. Take THIS letter to the woman between the potion shop and inn for the Green Letter. Finally, take the Green Letter back to the left guard for your Life Shard. |
 |
| After finding 5 of his signs, Sir Signe will reward you with a Life Shard for your efforts. |
 |
| After you acquire bombs, go to this cave just southeast of From cave and the Life Shard is yours. |
 |
| Early on, after completing the first couple dungeons, you'll see a lady in the north-west part of Raejack. Talk to her to learn that her sister is missing and wonders where she is. Later, in Ortego, talk to this old woman, who asks you to bring dancers to the village. Return to Raejack to talk to the sisters, who will agree to go to Ortego to dance. After, talk to this woman again next to the weapon shop for your Life Shard. |
 |
| In the north-westernmost house in Ortego, simply do this simple puzzle to claim your Life Shard. |
 |
| This man is in the house just north of Ortego's front gates. Inside, he will ask for 100G, so give it to him and go sleep at the Candata Inn nearby. Return to him and he'll ask for another 100. Repeat this process twice more and the Life Shard is yours. |
 |
| Play Blockout and simply beat all 5 stages to receive a Life Shard, so if you don't mind redoing it to get the Luck Mallet, just win the game and try again after getting the Shard. Or just get it all done in one, up to you really. |
 |
| In Ortego, the man in the central house will ask for water and give you a Water Jar. Take this to the lady in the southernmost part of Colneria to get Water. Take it back to this man to receive your Life Shard. |
 |
| Take a Blue Key to this door in the Desert Temple to grab another Life Shard for your collection. |
 |
| You can get this whenever you get the Anchor Rod. Head north from Raejack as if you were heading for the Dark Tower and stay near the west. Find this post and cave and your next Life Shard is as good as yours. |
 |
| Explore around B2 as you try to reach the next Life Shard after this. This chest has another super easy Shard that's just begging to be taken away by you! |
 |
| You need the Anchor Rod to reach this Life Shard way up on B1. Just watch out for the enemies on your way there! |
 |
| You might grab this on your way to the Hero Sword in A5. The grapple points are a little bit obscured, so you might want to change your camera angle to reach this tricky cave and claim your Life Shard. |
 |
| If you're hunting for the 10 signs for Sir Signe, then take a detour in this cave near the warp puzzle that you can reach on route to the Aqua Temple. A Life Shard awaits. |
 |
| In the chest near the man who sells you the Claymore and the Silver Ring is a quick and easy Life Shard. |
 |
| Use a Green Key on this door in the Flame Temple to net yourself another quick Life Shard. |
 |
| Here comes a doozy. First, when you first go to Colneria, talk to this girl to learn that she wants a spa. After, head to Jim's Shack and talk to the man by the entrance to receive the Spa Powder. Give it to her for 100G. Later, after beating the Flame Temple, talk to her again. She'll ask you for 3 ingredients for her spa, so say Yes. First, find the girl in Raejack near Dic's house to receive the Natural Herb. Next, head to Wardna's House and pay the man by the beds 100G for the Cypress. After, go to Fina's Inn and talk to the man closest to the door to receive the Nice Stone. Finally, take all of them back to this girl and she'll pay you with a Life Shard. Phew! |
 |
| Make your way towards the Desert Temple as normal, but as you head towards G5, use your grapple on a log to your left and push bombs towards the rocks in the path of the sand stream. The Life Shard is in this chest. |
 |
| As you make your way to Sue's cave, be sure to take a small detour near the beginning of your trek to find a Life Shard inside this cave that you bomb your way into. |
 |
| On your way to Sue's cave be sure to pick up this easy Life Shard in this chest. |
 |
| Head south from the Dark Tower and along this small path to reach this Life Shard. The Blue Dragon is jealous, I bet. |
 |
| Using the Anchor Rod, you can reach this cave in G2, north of Ortego Village, and collect this Life Shard. |
 |
| Head north into E1, and then go west and south to re-enter E2 to collect this Life Shard. You need the Wire Rod to get it. |
Master Magician! Maxed out the MAGIC bar.
 |
| After finding all 10 of his signs, Sir Signe, who resides in Wardna's House, will give you a Magic Up. |
 |
| In the Forest of No Return, instead of taking the left towards Indigo, continue going all the way down to reach this Magic Up. |
 |
| In the Forest Temple, you can find a Magic Up behind this Red Key Door. |
 |
| On your way to Ortego, make sure to take a small north-west detour to grab an easy Magic Up. |
 |
| On your way to the Desert Palace, don't forget to take the left sand stream to snag this Magic Up! |
 |
| Use a Blue Key on this door in the Aqua Temple to get yourself another Magic Up! |
 |
| After the Aqua Temple, talk to this girl in Jim's Shack, who mentions that they're running out of firewood. After, go to Wardna's House and talk to the man by the beds to get he Firewood. Next, return to this girl to receive the Spa Egg. Take this egg to the old man near Raejack's town square to receive a Cook Book. Take this to a girl in Colneria near the southern stairway to receive a Fresh Fish. Finally, take it to the boy in the Cordata Inn by the bookcase to receive your Magic Up. Whew, that was a doozy! |
 |
| In this dark and windy Wind Temple room, use a Green Key on this door to collect one more Magic Up. |
Rescued the Princess! The princess was restored to her true form.
See Found Sue! and Found Ai! for details on getting this trophy!
Have a Nice Night? Spent the night in Raejack with the princess.
This one is pretty easy. Immediately after Iris is restored to her true form, and before you get the Light Orb, go to Raejack and spend the night at the inn. That's all there is to it!
The Adventure Continues... Cleared the game without restoring the princess.
To get this trophy, simply beat the game without rescuing Ai and Sue. You don't need to reload a previous save to try and get this all in one go. Considering you have to do 3 playthroughs in total to platinum the game, save the fairies in one playthrough, and don't in another. Saves the hassle of making a save point all for two trophies.
And Everyone Lived Happily Ever After! Cleared the game with the princess restored.
Simply restore Iris to her true form and beat the game. Refer to Rescued the Princess! for details!
Booked a Monster! Booked a monster in the Bestiary.
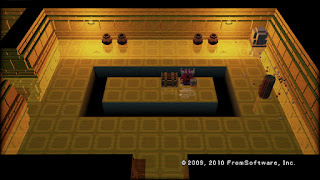
Simply record an enemy in the Bestiary to get this trophy. However, first we must get the Bestiary. To do so, we first must find the Small Ring in this room in the Desert Temple:

Then we have to give the ring to this red-headed girl in Ortego Village and she'll give you the Bestiary.


The Bestiary works like a sword, but must be equipped like any of your items to be used with the Circle Button. The book does do slight damage, so if you're trying to book an enemy, don't strike it with your sword. Simply whack the enemy with the book until a jingle plays and the word GET appears over your head and this trophy is yours.
Booked Eelagon! Booked Eelagon in the Bestiary.
As you cannot do this the first time you fight Eelagon, you have to either come back after getting the Bestiary, or do it during the boss rematches in the final dungeon. Just hit Eelagon like normal and eventually you'll see GET. You won't kill him with the book, so once you see GET, you can hack away at him. Book him and this trophy is yours!
Booked Queen Bee! Booked Queen Bee in the Bestiary.
See Booked Eelagon! for details on booking a boss!
Booked Giga Golem! Booked Giga Golem in the Bestiary.
See Booked Eelagon! for details!
Booked Kraken! Booked Kraken in the Bestiary.
See Booked Eelagon! for details!
Booked Dragon! Booked Dragon in the Bestiary.
See Booked Eelagon! for details!
Booked Dark Knight! Booked Dark Knight in the Bestiary.
See Booked Eelagon! for details!
Booked Fuelle! Booked Fuelle in the Bestiary.
See Booked Eelagon! for details!
Booked Onyx! Booked Onyx in the Bestiary.
See Booked Eelagon! for details!
Bestiary Complete! Booked all monsters in the Bestiary.
Simply book every single enemy in the Bestiary to obtain this trophy. There are very few enemies that are either really rare or will only appear once, such as Princess? and the Succubus in the final dungeon. I'll put the locations and possibly pictures of the rare or missable monsters. As for bosses, see each Bested! trophy for boss strategies, and see Booked Eelagon! for details on booking bosses.
Obtained the Ancient Sword! Acquired the Ancient Sword.
You'll obtain the Ancient Sword almost immediately after you leave Dotnia Castle. Simply retrace your steps to where the hero of old placed the sword and defeat the Guardians to obtain the Ancient Sword. On your way you will receive A Formidable Foe Has Fallen!


Obtained the Holy Sword! Acquired the Holy Sword.
After you complete the Desert Temple and acquire the Wire Rod, you can go get this extremely useful sword to replace your Ancient Sword. Simply head to Ortego Village and head south on the western side of the village. In this area you'll see a bombable wall near a staircase, so bomb your way in and head inside with the help of the Wire Rod.


Reach the end and avoid the traps while defeating enemies and you'll reach a chest at the end, with the Holy Sword inside. Depending on your inventory at this point, this sword is the best one you can have for a long while, so be sure to use it and invest some G into its stats.


Wow! You Obtained the Hero Sword! Acquired the Hero Sword.
Arguably one of the best swords in the entire game, you get this sword a lot later on. You can get this sword as early as right after the Flame Temple. As you start to make your way through the wilderness, you should quickly come across a building called Fina's Inn in area B4. Be sure to use the inn as I'll use it briefly as a point of reference. From the inn, head west into area A4 and head south. Grapple across the cliff and continue south to area A5. Watch out for Zombies as they can do serious damage to you. There's a bombable wall leading to a fairy fountain in the northwestern part of the area, so use it if need be. Continue towards the graveyard to the south and use the Flame Rod to burn the trees blocking the way in.


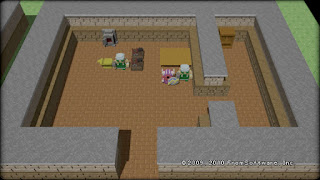
Once inside, reach this tombstone and push it up to reveal a cave.
 |
| There's normally a pot on either side of the tombstone I'm next to, but I destroyed them while fighting enemies. My bad. But this is the one you push to get inside. |
Once inside, this tomb, the spirit of the hero within will give you this powerful sword, and you'll collect your trophy in the process! After obtaining this sword, the Ancient Sword will disappear from your inventory.


King Block's Seal of Approval! Acquired a sword from King Block.
So before you can even reach King Block, you need the Wire Rod. Once you have that, go to Dotnia Castle. From there, head right into the next area and go through the path as if you were headed to Jim's Shack for the first time. In are E2, just as you enter north from E3, go left and cross over a few islands to reach the cave where King Block resides.


You need Small Blocks to buy a sword from him, and some are excellent swords even without an initial upgrade. Small Blocks are found in chests throughout Dotnia, and are dropped from Diamond Slimes and Blue Dragons, which are very rare monsters, and the drop rate isn't high either. The cheapest sword you can get is the Gorgon Sword for 5 Small Blocks. Purchase any sword from King Block and this trophy is yours! In order to obtain every sword from King Block, you need a whopping 88, with only 36 Small Blocks being obtainable through chests or rewards. If you plan to get every sword from King Block, try to do it in FROM mode, or New Game +, as the rare monsters spawn more, in my experience. Any any sword you buy from him will carry over to New Game + and you will have them at the get go!
All Swords Obtained! Acquired all the swords.
So there are a total of 24 swords in the game. Some are easy to obtain, some are harder to obtain, and some require you to play minigames or do some time-sensitive sidequests. If you can find them in a chest, I'll post a snapshot of the chest, and I'll put snapshots of the area of certain minigames. The swords and their method of acquisition are as follows:
Sword: Given to you by King Dotnia at the beginning of the game.
Ancient Sword: See Obtained the Ancient Sword! for details!
Holy Sword: See Obtained the Holy Sword! for details!
Hero Sword: See Wow! You Obtained the Hero Sword! for details!
Luck Mallet: Complete all 5 stages of Blockout without losing a ball. You can access the minigame by talking to this girl in the potion shop in Ortego:

Gorgon Sword: Purchase from King Block for 5 Small Blocks.
Luck Sword: Purchase from King Block for 8 Small Blocks.
Wing Sword: In Dash Circuit, complete the Block Circuit in under 25 seconds, and the Monaca Circuit in under 65 seconds. Block Circuit can be accessed by talking to this man in Raejack in the shop next to the blacksmith's shop after beating the Grass Temple:

And Monaca Circuit can be found by talking to this old man inside the inn in Colneria after completing the Aqua Temple:

Star Sword: Purchase from King Block for 10 Small Blocks.
Mage Sword: Purchase from King Block for 12 Small Blocks.
Rare Fish: After completing the Aqua Temple, talk to this man in Colneria:

Excalibur: Purchase from King Block for 20 Small Blocks.
Katana: Purchase from King Block for 15 Small Blocks.
Moon Sword: See bottom of this section for details.
Wyrm Sword: Clear all 5 stages of Block Defense without taking any damage. Block Defense can be played after certain points in the game, but you must beat the first stage to move on to the next and so on and so forth. The first stage can be played by talking to this old lady in Wardna's House after clearing the Forest Temple:

Stage two can be accessed by talking to this girl in the Candata Inn after beating the Desert Temple:

Stage three can be accessed by talking to this kid in Jim's Shack after completing the Flame Temple:
Stage four can be accessed by talking to this girl in Fina's Inn after completing the Wind Temple:

Stage five can be accessed by talking to this soldier near Hotel Nialliv after beating the game:

Tower Defense strategies are different depending on the person. To be 100% honest I used a guide as I'm no good at Tower Defense-like games. But otherwise, once you get the hang of it, it's not too difficult to do. Completing all stages without taking any damage and using no Life Ups will grant you the sword.
Orihalcon: Purchase from King Block for 18 Small Blocks.
Karasawa: After completing the Wind Temple, talk to Dic who lives in this house in Raejack:

Give him 5,000G and then stay the night at the inn. Then talk to him once again to receive your sword.
Wood Bat: After clearing the Forest Temple, find the bat-maker in Raejack. He's here:

He will tell you that he can make a bat for you if you bring him materials. Head over to Wardna's House and talk to this man:

He will tell you that there's good wood for bats in the Forest of No Return. Go through the area like normal until you reach the area that Indigo was at, then head two screens down to find this large tree:

Walk to the bottom of the tree (you had to have been told to go to the Forest by the man) and when the message pops up, select Yes to receive the Holy Wood. Return to the man in Raejack to obtain this sword.
Home Run Bat: After completing the Aqua Temple, talk to this man in Jim's Shack who wants to see your Wood Bat:

Say yes to him, then go to Colneria and talk to this girl in the house next to the inn to get your sword:

Giga Sword: After reaching Ortego Village, talk to this old woman who will tell you to bring dancers to Ortego:

Talk to Mina and Mary in Raejack to have them go to Ortego Village, then talk to the lady by the weapon shop for a Life Shard and to complete the event.
Later, after obtaining the Light Orb, return to Ortego and talk to this man who asks you to get Mary;s autograph:

Say yes to receive the autograph paper. Talk to Mary in the southeast part of Ortego, where she's dancing for a crowd of people. She'll give you her autograph. Take this back to the man to finally obtain this legendary sword!
Claymore: Bought from this merchant for 1,000G:

To reach him, head east from Colneria, and head east all the way along the beach.
Beam Saber: Obtain the Mirror of Truth from this area when asked to search:

Then talk to this man inside Hotel Nialliv to start the sidequest:

You must talk to the following 7 animals in any order you choose. The first animal is this dog just left of Fina's Inn:

Then talk to the man next to him to obtain the Dog Food (you need this to obtain Gungnir). Next, go to Wardna's House and talk to the chicken inside. Next, head off to Jim's Shack and talk to THAT chicken. Next, go to Ortego and talk to this cat:

Next go to the Candata Inn and talk to the dog just to the right of it. Then go to Colneria's south end and talk to this cat:

Lastly, go to Raejack and talk to this dog to receive a Life Shard:

Return to the man inside Hotel Nialliv to finally obtain the Light Saber!
Gungnir: Any time after obtaining the Dog Food during the Mirror of Truth quest, return to the Mountain Path as if you're heading to the Flame Temple and enter this cave:

Speak to the man inside and give him the Dog Food to obtain the Gungnir.
Gladius: Talk to this man on the right of Raejack's blacksmith building:
After beating the Flame Temple, head to Fina's Inn and talk to this man to get the Rust Sword:

Take that back to the man in Raejack to obtain the Gladius.
*The Moon Sword requires you to complete basically every side quest and have every key item in the game. This requires you to do a LOT of time-sensitive quests. I won't put all of them here as it would make this guide way longer than it already is and that'd be way too much for people to go through. I would suggest going to the guide I used on GameFAQs, by the user EgHeadFool. He lists every side quest from availability point and his guide would also benefit you for doing Block Defense. Sorry I didn't list it all but it would make this guide ever messier than it is!*
Sword: Given to you by King Dotnia at the beginning of the game.
Ancient Sword: See Obtained the Ancient Sword! for details!
Holy Sword: See Obtained the Holy Sword! for details!
Hero Sword: See Wow! You Obtained the Hero Sword! for details!
Luck Mallet: Complete all 5 stages of Blockout without losing a ball. You can access the minigame by talking to this girl in the potion shop in Ortego:

Gorgon Sword: Purchase from King Block for 5 Small Blocks.
Luck Sword: Purchase from King Block for 8 Small Blocks.
Wing Sword: In Dash Circuit, complete the Block Circuit in under 25 seconds, and the Monaca Circuit in under 65 seconds. Block Circuit can be accessed by talking to this man in Raejack in the shop next to the blacksmith's shop after beating the Grass Temple:

And Monaca Circuit can be found by talking to this old man inside the inn in Colneria after completing the Aqua Temple:

Star Sword: Purchase from King Block for 10 Small Blocks.
Mage Sword: Purchase from King Block for 12 Small Blocks.
Rare Fish: After completing the Aqua Temple, talk to this man in Colneria:

Excalibur: Purchase from King Block for 20 Small Blocks.
Katana: Purchase from King Block for 15 Small Blocks.
Moon Sword: See bottom of this section for details.
Wyrm Sword: Clear all 5 stages of Block Defense without taking any damage. Block Defense can be played after certain points in the game, but you must beat the first stage to move on to the next and so on and so forth. The first stage can be played by talking to this old lady in Wardna's House after clearing the Forest Temple:

Stage two can be accessed by talking to this girl in the Candata Inn after beating the Desert Temple:

Stage three can be accessed by talking to this kid in Jim's Shack after completing the Flame Temple:

Stage four can be accessed by talking to this girl in Fina's Inn after completing the Wind Temple:

Stage five can be accessed by talking to this soldier near Hotel Nialliv after beating the game:

Tower Defense strategies are different depending on the person. To be 100% honest I used a guide as I'm no good at Tower Defense-like games. But otherwise, once you get the hang of it, it's not too difficult to do. Completing all stages without taking any damage and using no Life Ups will grant you the sword.
Orihalcon: Purchase from King Block for 18 Small Blocks.
Karasawa: After completing the Wind Temple, talk to Dic who lives in this house in Raejack:

Give him 5,000G and then stay the night at the inn. Then talk to him once again to receive your sword.
Wood Bat: After clearing the Forest Temple, find the bat-maker in Raejack. He's here:

He will tell you that he can make a bat for you if you bring him materials. Head over to Wardna's House and talk to this man:

He will tell you that there's good wood for bats in the Forest of No Return. Go through the area like normal until you reach the area that Indigo was at, then head two screens down to find this large tree:

Walk to the bottom of the tree (you had to have been told to go to the Forest by the man) and when the message pops up, select Yes to receive the Holy Wood. Return to the man in Raejack to obtain this sword.
Home Run Bat: After completing the Aqua Temple, talk to this man in Jim's Shack who wants to see your Wood Bat:

Say yes to him, then go to Colneria and talk to this girl in the house next to the inn to get your sword:

Giga Sword: After reaching Ortego Village, talk to this old woman who will tell you to bring dancers to Ortego:

Talk to Mina and Mary in Raejack to have them go to Ortego Village, then talk to the lady by the weapon shop for a Life Shard and to complete the event.
Later, after obtaining the Light Orb, return to Ortego and talk to this man who asks you to get Mary;s autograph:

Say yes to receive the autograph paper. Talk to Mary in the southeast part of Ortego, where she's dancing for a crowd of people. She'll give you her autograph. Take this back to the man to finally obtain this legendary sword!
Claymore: Bought from this merchant for 1,000G:

To reach him, head east from Colneria, and head east all the way along the beach.
Beam Saber: Obtain the Mirror of Truth from this area when asked to search:

Then talk to this man inside Hotel Nialliv to start the sidequest:

You must talk to the following 7 animals in any order you choose. The first animal is this dog just left of Fina's Inn:

Then talk to the man next to him to obtain the Dog Food (you need this to obtain Gungnir). Next, go to Wardna's House and talk to the chicken inside. Next, head off to Jim's Shack and talk to THAT chicken. Next, go to Ortego and talk to this cat:

Next go to the Candata Inn and talk to the dog just to the right of it. Then go to Colneria's south end and talk to this cat:

Lastly, go to Raejack and talk to this dog to receive a Life Shard:

Return to the man inside Hotel Nialliv to finally obtain the Light Saber!
Gungnir: Any time after obtaining the Dog Food during the Mirror of Truth quest, return to the Mountain Path as if you're heading to the Flame Temple and enter this cave:

Speak to the man inside and give him the Dog Food to obtain the Gungnir.
Gladius: Talk to this man on the right of Raejack's blacksmith building:

After beating the Flame Temple, head to Fina's Inn and talk to this man to get the Rust Sword:

Take that back to the man in Raejack to obtain the Gladius.
*The Moon Sword requires you to complete basically every side quest and have every key item in the game. This requires you to do a LOT of time-sensitive quests. I won't put all of them here as it would make this guide way longer than it already is and that'd be way too much for people to go through. I would suggest going to the guide I used on GameFAQs, by the user EgHeadFool. He lists every side quest from availability point and his guide would also benefit you for doing Block Defense. Sorry I didn't list it all but it would make this guide ever messier than it is!*
Forged a Sword! Made your sword stronger at the blacksmith.
This one is easy to obtain. Simply upgrade your sword once at the blacksmith and this trophy is yours!
That's a Big Fat Sword! Maxed out the Giga Sword.
The Giga Sword is the BEST SWORD IN THE GAME! It really is! If you have the patience to not only play through most of the game in order to get it, after doing a few small side quests, and the patience to eventually invest like.. over 100,000G into this sword to give it full stats (every category takes about 9,999G in total to max out. Yikes..), you will never use another sword again. This sword is extremely large and extremely long, has spin and pierce, and does massive damage. It can effectively one-shot nearly every enemy besides bosses. It is well-worth the investment and effort. The process to get the sword is up in the big explanation of All Swords Obtained!
You're a Survior! Survived Spelunker Mode for 10 hours.
You're a Survior! Survived Spelunker Mode for 10 hours.
Spelunker Mode is obtained after you rescue Spelunker while playing New Game + (FROM mode). Spelunker Mode, like the original Spelunker game, has you dying in just one hit from anything, and Wonderdust will not revive you if you die. If you dash into a wall, the death theme will play but you'll instead have invulnerability for a few seconds. This is essentially how you defeat the bosses. Even as you get more Apple Containers, you still die in one hit. 10 hours is nothing, even while trying to do it fast, as I beat it in 13 hours and only went for the Giga Sword. If you don't have the Bested! trophies by now, you WILL receive them in this mode as you can't take damage or you'll die. Best of luck!
Triple 7s! Collected 777G.
This isn't too bad, but this may seem a little misleading at first. By "Collect 777G," it doesn't mean just collect G until you bypass 777. You need to, at one point, hold exactly 777 G. When you get near it, just defeat rabbits around Raejack as they tend to drop 1G, or if you go over, try to spend money to get as close to 777 as you can. Not super difficult, a pretty easy trophy.
You Made a Friend! Made a character model.
Now making a custom character seems difficult, but really if you wanna do this the cheap and easy way, go to the Editor option on the title screen and when you make a new character, just load a pre-existing template, make a small edit to all of the sections, and save it. Super easy. If you wanna make your own character though, go for it. This isn't as hard as it sounds.
Around the World! Visited all maps.
This means more than simply visiting every area on the map and filling it in. You must also enter every room in every dungeon, all of the houses, and all of the caves. It probably goes as far as every place in Dotnia Castle as well. It's not possible to see where you have or haven't been, so it's best to keep a checklist. These areas do include the tomb where you obtain the Hero Sword and the caves where you find Sue and Ai. After you've entered the last room (which will end up being the room where you battle Fuelle in the final dungeon) this trophy will pop!
Souvinir Photoshoot! Took a snapshot.
At any time you pause the game, choose the snapshot option and just, well, take a picture, and this trophy is yours. Every picture in this guide was taken from the snapshot option and then taken from a usb drive to my laptop where I could upload them, so it gives you an idea on how it looks, at least.
Flawless Hero! Cleared the game without dying.
This one is also a little misleading. If you do die, do NOT choose "Continue" from your options. Load your last save. Or just be careful not to die. You CAN be revived by Wonderdust and still obtain this trophy, so always have some on hand! And always be sure to save often, because you never know when the game might crash or you might die.
And the World was Saved! Cleared the game in FROM mode.
FROM mode is this game's New Game +, in which it's the same game but enemies do more damage and you can start the game with any sword you purchased from King Block so that's really useful. Also in FROM mode, you can find Spelunker and save him to unlock the challenging Spelunker mode. Simply beat the game on FROM mode, Princess restored or not, and this trophy is yours!
Spelunker Extraordinaire! Cleared Spelunker mode.
You can either save Spelunker in FROM mode, or you can enter your hero's name as Spelunker in a new game to instantly access this difficult mode (sounds like an allusion to The Legend of Zelda, where if you enter your file name as ZELDA, you start the game on the 2nd quest that's a lot more challenging). As stated earlier, Spelunker mode is hard. You will die a lot and it will get frustrating but with enough patience and reflexes you will triumph and receive this hard-earned trophy! Good luck, it'll take all your skills to win this one!
Obtained the Hero Shield! Acquired the Hero Shield.
The Hero Shield is the best shield in the game and can block any attack as long as you're blocking it properly. In order to get it, you have to upgrade your shield several times through the game. Here's every shield and how to obtain them: (pictures of locations)
Shield: Given to you by King Dotnia at the beginning of the game.
Iron Shield: Purchase for 100G at any time from the shop in Raejack next to the blacksmith.
Magic Shield: Found within this room in the Aqua Temple:

Fire Shield: Talk to this man in Jim's Shack once you have the Magic Shield:

After being requested to obtain a Fire Ruby, go to this rock outside the Flame Temple and select Yes when prompted to receive your Ruby:

Take the Ruby back to the man in Jim's Shack to obtain this shield.
Bolt Shield: After obtaining the Fire Shield, talk to Dic in Raejack. Pay him 1,000G and then stay at the inn. Talk to him after to obtain this shield.
Hero Shield: After obtaining the Bolt Shield, head towards the Dark Tower and enter this cave just west of it:

Bring a key of every color to reach the end and this man will give you the Hero Shield in exchange for the Bolt Shield, and you will finally obtain this trophy:

Spelunker's Savior! Cleared the Spelunker event.
Firstly, you need the Flame Rod and the Anchor Rod. You must reach him in area A1, the north-westernmost part of the world map, on the west side of the area. Once you free him, you obtain this trophy and you unlock Spelunker mode! Note that you can ONLY do this in FROM mode!
 |
| In order to get the trophy, you need to burn the wood and reach him from the other side. I took the long way to him after getting the Anchor Rod just for this picture. |
So that's it for this Trophy Guide! Holy wow, this took ages to fully type out! Like, it took me 3 days to beat the game and get the pictures, and I've spent the last few days typing all of this up, checking guides to make sure my info was doubly-correct, and just, this took ages, really. I had a lot of fun though, but wow I should have expected a Trophy Guide WITH pictures being hard, or at least tedious, work. I'm actually surprised that I had pictures for everything. I was afraid that I missed something and was really worried I'd have to search and I was honestly worried I would miss the deadline for it. Future guides won't have as many pictures, sadly, as not every game has a screenshot function and I lack a tool to get decent quality screencaps from anything really. Like if I were to take a picture using anything else, it would be bad quality, even if it worked out well enough to get the point across.
But anyway, I really hope you enjoyed this Trophy Guide, and I really hope it helps you obtain your platinum trophy, or at least helps you get closer to it. I love this game, it's a ton of fun, even if it does piss me off when it crashes sometimes. As always, if you made it all the way through, thank you so much and I greatly appreciate it. Please, leave some feedback and tell me how I can improve, as it would help out greatly. If not, well, I hope you like it anyway and I hope you enjoyed it. Thanks again, and as always, until next time, I will see you later! :D
*This game took me a total of 3 years and 1 month to finish, from my first trophy to the platinum, due to an eventual hiatus from this game. My first trophy was "Slice and Diced!" which was received on July 27th, 2012 at 7:32 PM. My final trophy was "Spelunker Extraordinaire!" which was received on September 20th, 2015 at 11:07 PM, along with the platinum, "Congratulations!" This platinum trophy is my 25 platinum trophy I have received.*
No comments:
Post a Comment